Exercise 1
Task: Develop a new version of the detection rule created in the first lab that identifies the exploit within the payload by applying keyword options such as offset, within, depth, and distance.
Instructions:
Begin by duplicating the rule you previously created in the last exercise. Paste it into a new file to work with a clean version. Make sure to update the sid to a new, unique value and reset the rev (revision number) to 1. Although it’s not mandatory, updating the msg field is encouraged to help distinguish this alert from the earlier version visually. This isn’t strictly required because the sid is already unique and is displayed in any alert output.
1) I analyzed raw packet data to determine the precise starting point of a specific payload pattern: the serie of Xs located in the payload . This task focused on calculating the payload offset using hexadecimal interpretation of both IP and TCP headers.
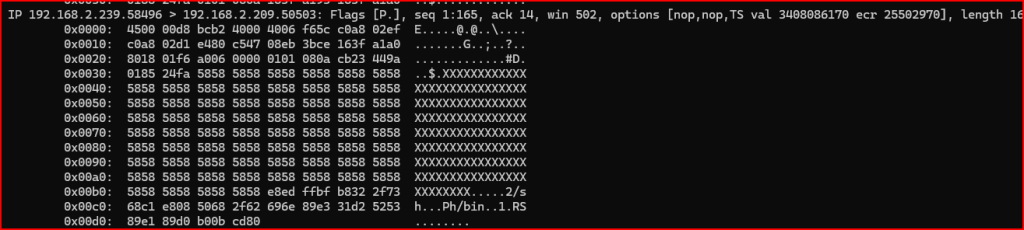
The packet began with the hex value 4500, indicating a 20-byte IP header. Further inspection of the header—specifically the value 4500 00d8 bcb2 4000 4006—confirmed the use of TCP, as represented by the protocol number 6. Examining the TCP header at offset 0x0020, I found the value 8018, where 0x80 corresponds to a TCP header length of 8 (multiplied by 4), resulting in 32 bytes.
By adding the 20-byte IP header to the 32-byte TCP header, I determined the payload begins at byte offset 52, or 0x34 in hexadecimal. Using the tcpdump output, I identified the line starting at offset 0x0030 and noted that the first byte at 0x0034—0x58—was the beginning of the payload.
We can use this information to write a more accurate and efficient alert now that we know where our Serie of Xs begins. We can add the option offset 0 right after our content:

Let’s try and run this alert to make sure it functions as intended.

Both Alerts successfully Triggered.
2) I can continue improving my detection rule by optimizing not just where the signature search begins in the payload, but also how far the inspection should go. This optimization involves defining the maximum distance into the payload that the string matching engine will search for the targeted content.
To implement this, I added one or more rule options to constrain the search window. This ensures the matching engine stops looking after a defined number of bytes, which helps minimize unnecessary processing and improves rule efficiency.
To do this, I am going to use the Depth option which refers to the size or length of a specified content.

We added a depth of 13 to our Xs content because we used a string of 13 Xs in our alert content and therefore the minimum amount we can use for our depth option is also 13.
3) The next step in improving the accuracy of my detection rule is taken by targeting specific binary content found within the payload of the exploit. My goal was to define a content match that would identify a sequence of binary data located between two known strings—XXXXXX and /sh.
To begin, I used Snort’s support for binary content matching by enclosing hexadecimal byte sequences within pipe symbols (|). For example, a match string like |89 90 1a 2b| would correspond to a precise set of bytes in the payload. This level of specificity helps reduce false positives and ensures that my rule only triggers on highly characteristic patterns of the exploit.
The bytes of interest—e8 ed ff bf b8—were identified within the packet at a specific payload offset. This additional match was added immediately after the initial XXXXXX... content match:

Let’s now use the distance and within modifiers to control how closely Snort looks for a second match relative to the first one. This approach is especially useful when trying to match content that consistently appears a specific number of bytes after another known pattern.
By analysing the hex output of the packet, I identified the relative location of these two key elements in the payload: the string represented by XXXXXX... and the binary sequence (e8 ed ff bf b8). Although these bytes appeared to be directly after the X’s in the data, I had to account for the fact that the initial content match was set with an offset of 0 and a length of 13 characters. This required adjusting the distance value accordingly to avoid skipping the binary data or misaligning the match.
Additionally, I calculated the exact length of the binary pattern to determine an appropriate within value, ensuring that Snort stops scanning shortly after the desired match.

4) Simplify the logic by combining both content elements into a single content match. This approach reduces the number of operations Snort needs to perform, improving performance and clarity.

Initially, my instinct was to match strings at their starting point. However, I discovered that it’s equally valid—and often more effective—to match the trailing portion of a string instead.
This realization helped me streamline my rule logic. Since the payload in this case happened to start at offset zero, it was tempting to match from the beginning. But had the payload been preceded by other data, that approach would have failed. By refactoring the rule to focus on the ending portion of the string, I improved its reliability and flexibility in different network conditions.
5) Add offset, within, distance and depth options to try and make this revised rule as efficient as possible
It was about figuring out how to place each piece of the rule so Snort could accurately spot our target pattern in the payload.
Here’s what I figured out:
- We already knew there were 132 X characters in the string, and we’d used 13 of them in a previous rule. That gave us a starting offset of 119 for our match.
- Those 13 characters were followed by 5 bytes of binary data. So, I set the
depthto 18 to capture all of that (13 + 5). - Since the
/2/shstring comes right after the Xs and binary bytes, it needed to be searched immediately after the first content match, which justified using offset 119. - Instead of matching
/2/shright away as the next content, I added it with adistance: 0from the previous match—basically telling Snort to look for it right after. - I also had to make sure
Pb/bin, the final part of the payload, was found within 4 bytes after/2/sh. It turns out it starts 3 bytes later and is 6 bytes long, so I useddistance: 3andwithin: 6.
Once I put all these details together, I ended up with a rule that’s a lot more efficient and accurate than the one I started with. Here’s what the refined rule looks like now:

6) In this exercise, I simulated a real-world scenario where my Snort rule—developed through the previous lab steps—had been deployed in a production environment for a while. Unfortunately, despite that setup, someone still managed to exploit the LamanServer, and no alerts were generated. That was a red flag.
To figure out what went wrong, I pulled packet captures of the suspected exploit and used them to test my detection rule inside my Snort lab setup. Specifically, I ran the rule against the 02_exploit.pcap file.

The goal here was to determine why the IDS didn’t pick up the attack. I used all the rules I had built in the previous exercises and evaluated them against the new pcap file to see if they triggered as expected—or if the attacker had changed something just enough to evade detection.
Leave a Reply