The goal of this lab is to familiarize myself with the basic functionalities of Wireshark.
Exercise 1 – Wireshark Profile Setup
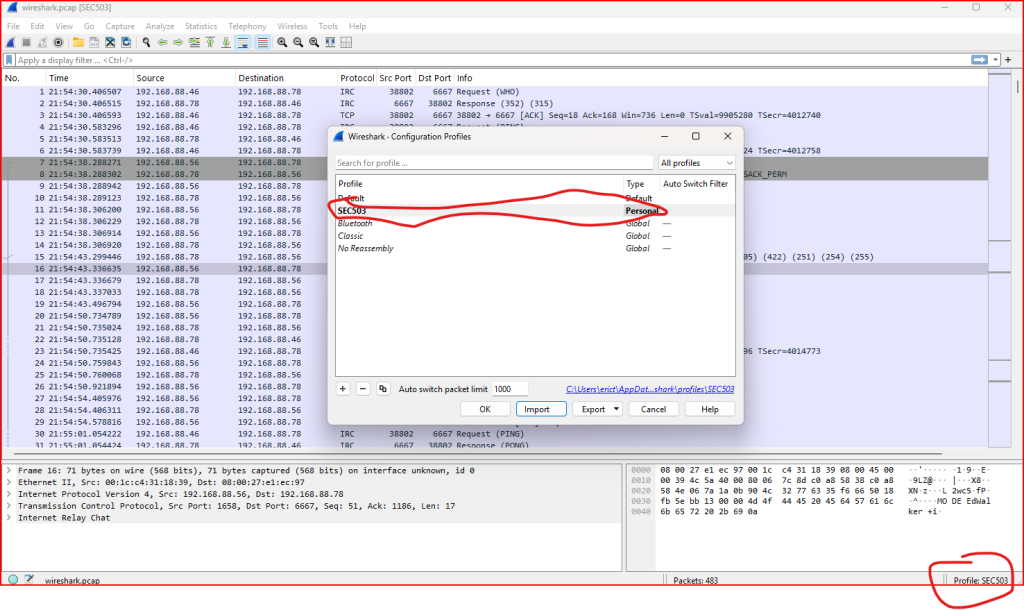
To kick off the lab, I started by setting up a custom Wireshark configuration profile. These profiles are really helpful because they let you tailor things like display columns, settings, and layout to match your workflow. You can switch between different profiles depending on what you’re analyzing, and it’s easy to import/export them to share with others.
For this exercise, I used a pre-made profile provided for the class. I opened Wireshark on my system and imported the SEC503.Wireshark.profile.zip file. Once that was in place, I loaded the wireshark.pcap capture file, which set me up to move on to the next part of the lab (Exercise 2).
Exercise 2 – Identifying TCP Protocols in the PCAP
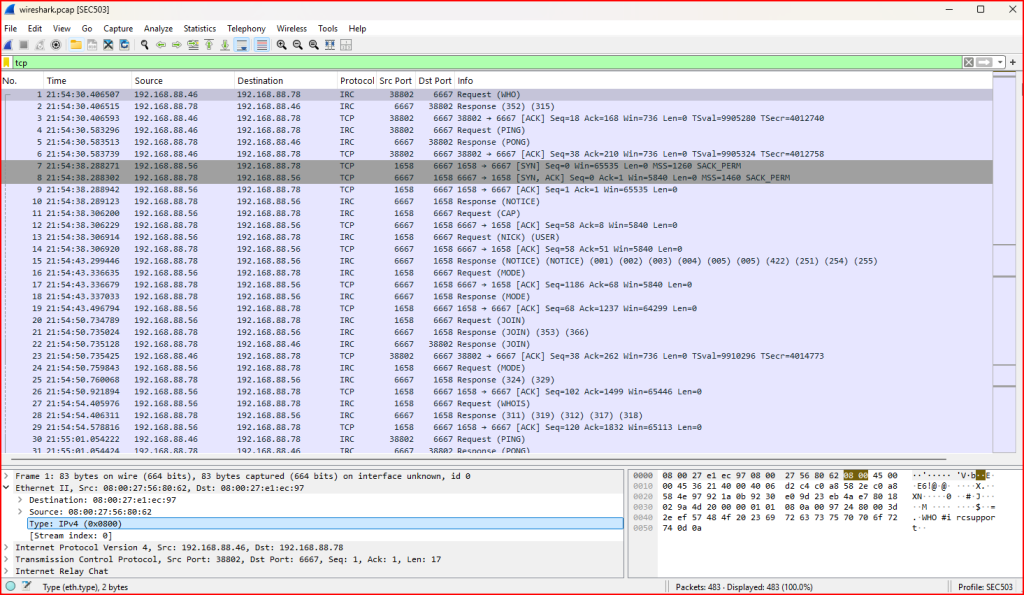
In this part of the lab, I analyzed the provided wireshark.pcap file to identify the different TCP-based protocols present in the capture.
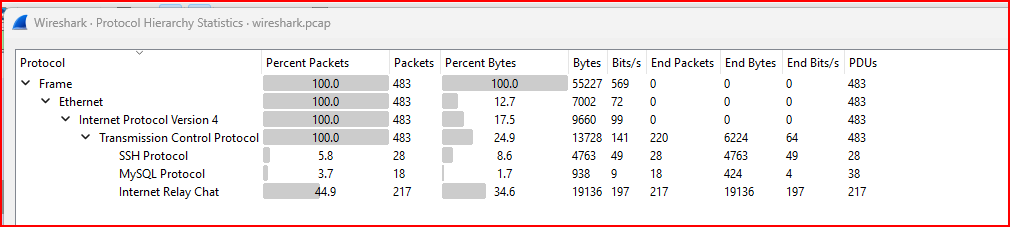
By going to the Statistics menu in Wireshark and selecting Protocol Hierarchy, I was able to quickly identify the three TCP protocols used in the capture file. This feature provides a clear breakdown of all protocols seen in the traffic, making it easy to spot which ones are running over TCP:
-SSH
-MySQL
-Internet Relay Chat
How many different IP addresses were involved in conversations in this pcap?
To answer this, I opened the Conversations window under the Statistics menu in Wireshark. This tool displays all IP-level conversations and allowed me to easily identify how many unique IP addresses were communicating in the capture. It’s a quick way to get an overview of the network activity and see which hosts were involved.

We can see that 4 different IP addresses were involved in 3 conversations in this file.
What is the largest number of Bytes exchanged in any IPv4 conversation?
To determine the largest number of bytes exchanged in any IPv4 conversation, I used the IPv4 Conversations tab under Statistics > Conversations in Wireshark. This view lists the total byte count for each conversation.
From the output, I found that the highest byte exchange between any two hosts was 31k. This gave me a quick insight into which conversation involved the most data transfer within the capture.

Exercise 3 – Counting TCP Conversations
How many different TCP conversations are in this pcap?
For this exercise, I used the Statistics > Conversations feature in Wireshark and navigated to the TCP tab. This tab lists all the unique TCP sessions found in the capture file. Each entry represents a separate conversation between two IP addresses over TCP.

We can see 4 different TCP conversations in this file.
What is the duration of the conversation that lasted the longest?
To answer this, I stayed in the TCP tab under Statistics > Conversations in Wireshark. This view includes a Duration column, which shows how long each TCP conversation lasted. By scanning this column, I identified the conversation with the longest duration (776.1629 seconds)

Exercise 4 – Inspecting Ethernet Type
Before starting this task, I made sure that all three Wireshark panes were visible: the packet list, packet details, and packet bytes. If they weren’t showing, I adjusted the window size by dragging from the bottom-right corner until they appeared.
Navigate to the first packet in the pcap. What is the hexadecimal value of the Ethernet type?
I selected the first packet in the capture and expanded the Ethernet II section in the middle pane. From there, I located the Type field, which shows the Ethernet type in hexadecimal format (0x0800). This value indicates the protocol being used at the next layer (IPv4 here).
What is the IP Time To Live Value?
We can find it by expanding the IPv4 section in the middle pane and find that the value is equal to 64.

What transport layer follows the IP layer?
We can find our answer right under the TTL line under Protocol. Hre we can see that the transport layer is TCP (which corresponds to an Hexadecimal value is 0x06)

What is the last hexadecimal byte value of the TCP header ?
By clicking on the TCP header in the middle pane, the entire TCP header gets highlighted in the lower pane and we can see that the last hexadecimal byte value is 0xef

Exercise 5 – Inspecting MySQL Traffic
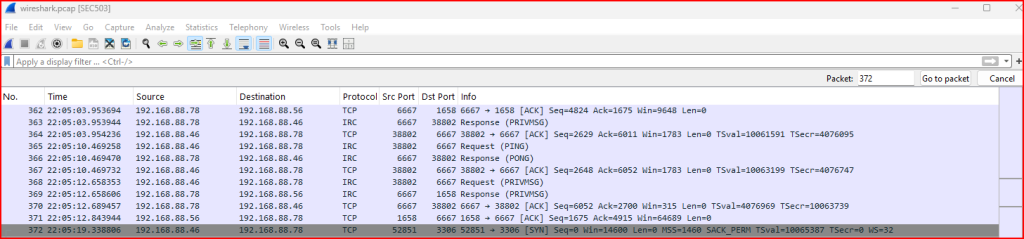
As identified earlier using Protocol Hierarchy Statistics, the pcap file contains MySQL traffic. According to the instructions, there is a single MySQL session that begins at packet 372.
Locate the MySQL session that begins in packet 372. Follow the MySQL TCP conversation. What is the version of the MySQL server package for Ubuntu?
To complete this task, I navigated to packet 372 by going to the Go menu and selecting the Go To Packet option:
I then right-clicked on it to select Follow > TCP Stream. This allowed me to view the entire MySQL session in context. By examining the initial handshake and server response, I was able to extract the MySQL version number used in the Ubuntu server package (5.0.51a-3ubuntu5.8). This kind of inspection is useful for identifying software versions and potential vulnerabilities in network traffic.
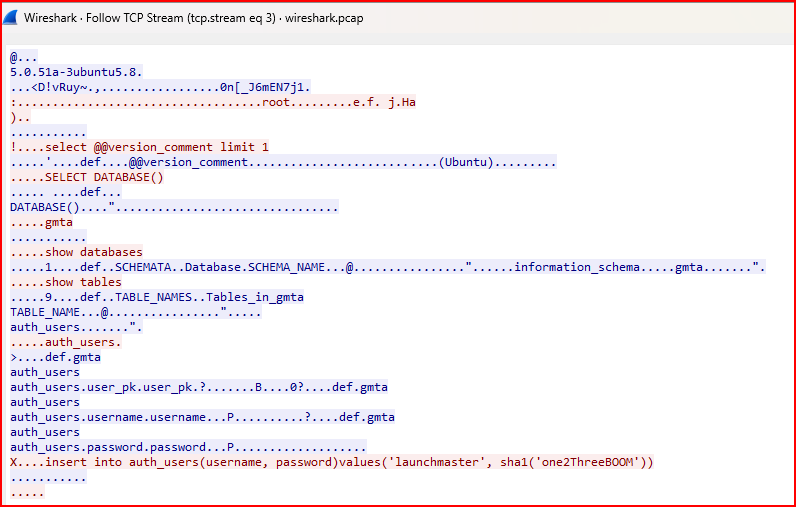
What is the name of the SQL Table that the user performs an Insert Into command on?
At the bottom of the TCP stream, we can see that the command is performed on a table called “auth_users”.
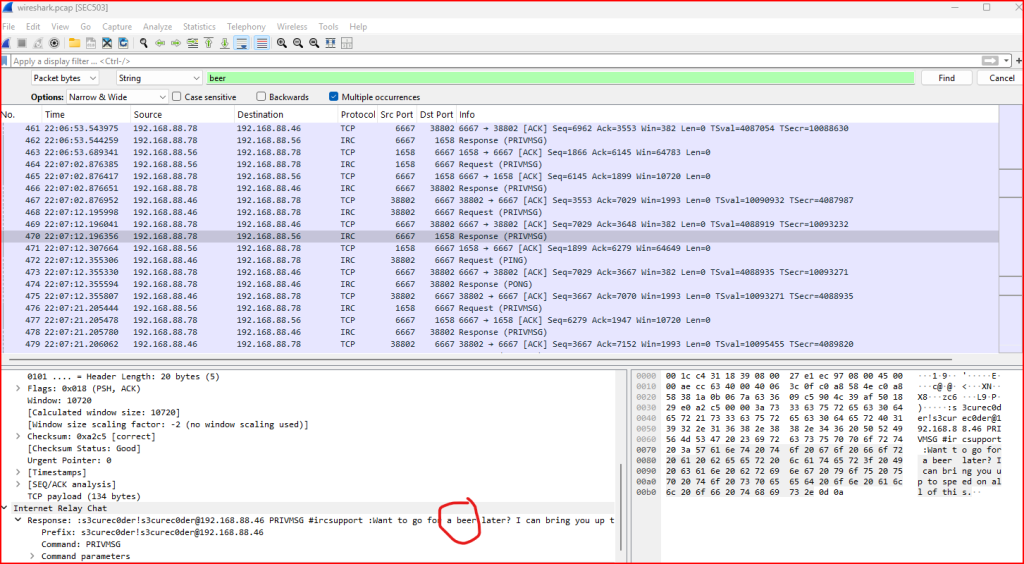
Exercise 6 – Finding a Specific String in Packet Data
What is the last packet that contains the string “beer”?
To complete this exercise, I used Wireshark’s Find Packet feature by pressing Ctrl + F and switching the search type to String within Packet Bytes. I then searched for the keyword “beer”.
Wireshark highlighted each packet containing this string. I scrolled through the results to locate the last packet in the capture that contained “beer” and recorded its packet number (470). This was a fun way to practice content-based searches within packet data.
Leave a Reply